Thursday, August 9, 2012

Let's make a mess - an Eton one of course!!

SIMPLE, LUSCIOUS, DELICIOUS!
But why is it called Eton Mess? Because it is traditionally served at the Eton College annual cricket game against the students of Winchester College. The word mess I would suspect refers to the look of the dish which is very rustic and free form but that part cannot be confirmed through my Googling. Strawberries are the traditional fruit used in an Eton Mess, for it is England after all, but I have chosen to use raspberries as there were no decent strawberries to be had and then along came some excellently priced and highly desirable cherries so I mixed the two - and why not?

It is so simple, with three main ingredients, and disarmingly charming! ...and if you choose to use purchased meringues instead of making them well then it's also awfully easy - just a matter of whipping cream, macerating berries and assembling your mess!

Always read through the recipe first to know what you need, and what you need to do and when.

You will need the following for one large serving or two small - I ate the whole thing above top and am now sitting here feeling a little overwhelmed so I suggest, if you can control yourself, to make this for two people - or one person at two sittings :) Of course you can double, triple or more for a crowd and everything will work just as well.

1 cup heavy/double cream - buy the very best you can, whipped with a couple of tablespoons of sugar (less or more to taste, your choice) and a teaspoon of vanilla. Return to the fridge after you have whipped it.

6-8ozs of your chosen fruit - strawberries, raspberries, blueberries - cooked gooseberries if you can find them - and I used cherries because I love them so - tossed with a good tablespoon of sugar and macerated for a couple of hours until the juices run.

4 small meringues either made or bought - recipe follows if you want to make your own
This ingredient list is very loose you can have more or less of whatever you want and it will still taste marvellous!
Here are my cherries and raspberries macerating happily
MERINGUE RECIPE: Try to make on a dry day - humidity and thunderstorms can either effect the consistency of the beaten eggs or make them curdle - so the dryer the day the better - my day was a little humid and they turned out a little chewier than I personally like but they were still very good.
 
Set the oven at 250F – nice and low. Cover your baking tray with a sheet of parchment or greaseproof paper – no need to grease the paper.

INGREDIENTS:
2 egg whites at room temperature
4 ozs sugar...fine if don't want your meringues to be gritty - mine were a bit gritty because I use organic sugar from the Belfast Coop and it doesn't come in fine - and I am OK with a little grittiness in my meringues
1/2 teaspoon of vinegar
1/2 teaspoon of vanilla extract

1. Whip the egg whites until stiff

2. Add sugar 2 tablespoons at a time and whip, whip, whip until all the sugar has been added and the result is glossy and dense and divine as the picture below.
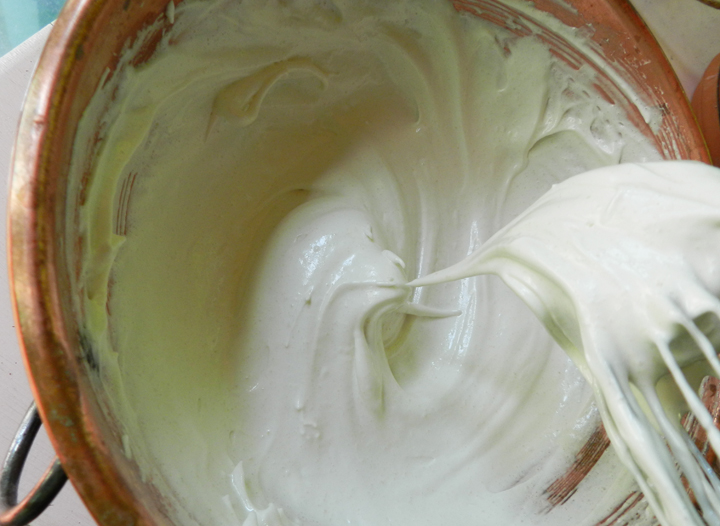
After much whipping you end up with a lovely dense deliciousness about the consistency of really good mayonnaise.
3. Mix vinegar and vanilla together in a small bowl and then gently fold into the egg white and sugar confection.

4. Pile dollops of meringue onto parchment and spread out into rough and rustic rounds for this is called a mess and the meringues end up being broken apart so their appearance is not important!
This was the first batch I made - they looked great going in the oven but they just did not set up - they stayed bouncy and soft - took me a while to back track and eventually discover I had only put in half the amount of sugar I should have done - so if you halve or double recipes do make sure you get the quantities right!
5. Bake in a 250F oven for about an hour and a half then turn oven off and leave meringues in there to cool - this is for a meringue that still has some softness and chew in the centre - if, like me, you prefer a meringue that is like ceramic (and yes I know that is not fashionable because of French macaron everyone wants a bit of chew) then you can cook for another hour making sure that they do not brown - so check on them occasionally.


The second batch baked to perfection!


So you have sweetened whipped cream, your chosen macerated berries and your perfect meringues - heaven is just a short while away!

TO ASSEMBLE Choose an attractive vessel for your ambrosial delight - plop some whipped cream in the bottom, crush a couple of meringues over this, dollop half the fruit over that and repeat. And now you have an ETON MESS - to make it even more perfect I like to let the flavours meld a little - pop in the fridge for about an hour - take out, allow to warm a little and dig in!!


Please do let me know if you try this and what you think and if you make one why not post your pictures and thoughts on my Facebook page at www.facebook.com/PatriciaSheaDesigns

Here are some pictures of the day lilies blooming in my garden right now - aren't they the most wonderful colours and look at the red leaves on the two different individual ones - they are the opposite formation from one another!


Happy messing about everyone!

If perchance you like my jaunty little Union Jack design as seen in the top picture here's a link to many and varied items adorned with such at my CafePress shop. Cheers!

Saturday, July 28, 2012

The Humble Flowers of Blueberry Hill

My house is right next to a blueberry barren and when the weather is good I wander up there and see the whole of the top of Penobscot Bay laid out before me, including Blue Hill across the bay. Commercially blueberries only fruit every second year and this is the off year so there are few blueberries to be seen but lately I've been paying attention to the tiny, quiet humble little flowers up there and today I photographed some of them as seen below - aren't they pretty - I don't even know the names of most of them - do you?

A snowflake in July? The lovely bobbing Queen Anne's Lace are here in full force - wafting  around like spinning plates by the side of the roads and highways - they have a lovely old fashioned fragrance that reminds me of Mimosa.

Is this Purple Vetch?


A glowing Black Eyed Susan

A teeny tiny daisy that grows about 3.5 feet tall and smells so deliciously of light lemon

A type of Spirea perhaps?

What are these little bell like flowers?

Good old Black Eyed Susan's against the faraway hills.

Queen Anne's lace in the making - each 'bud' has one large leaf to the side.

A real close up of the Queen Anne's Lace - again very wintery I think

I don't know which kind of flower this used to be but the basket weave  in the centre there is near perfect

And my fave - the lovely little clover - awww!!
On the way back down I did espy a few blueberries nestling in the leaves -  I think the fox, coyote, turkey and deer may get to enjoy them.
August is nearly here - what delight should I make for my next recipe - it should be something with blueberries methinks!!

Saturday, July 14, 2012

St. Leonard's Custard Pudding


Here is the first recipe from my newly acquired book “The Etiquette of English Puddings” published by Copper Beech Publishing and gifted to me by my dear friend Tabby (aka talented photographer Marcie Jan Bronstein) - St Leonard’s Custard Pudding – but isn’t it really a pie or tart – here we go again with the definition of pudding! My partner James is so confused at this point – he’s always asking "…and is THAT a pudding?” Simpler to say yes Dear it’s a pudding and anything you have for dessert in the UK is also a pudding. Ah – the vagaries of pudding…


THE RECIPE
This recipe made two pies in oval dishes 6" x 4" with a little filling to spare.
          
First make the Easy Peasy crust from Let Them Eat Cake Bakers in Belfast, Maine:

EASY PEASY SWEET TART CRUST: I made 10 miniature tarts from the recipe here:
1 1/2 cups/6ozs of unbleached white flour
1/2 cup/2ozs confectioners/icing sugar
1 stick + 1 tablespoon/ 4 1/2ozs butter VERY COLD
1 large egg yolk
a tad of milk or cream if your dough doesn't stick together
1. Sift dry ingredients together into a medium sized bowl.
2. Grate the butter into the dry ingredients and rub in until like breadcrumbs.
3. Add egg yolk and blend carefully until the dough sticks together
4. Mine didn't stick together with just the egg yolk so I added baby drop by baby drop some cream until it did start to come together...be careful once it does start to come together it does so quite quickly...don't let it get sticky!!
5. Tear off pieces of the dough and push into the pie dishes until you have somewhat evenly covered them, then bob in the fridge until you are ready to use them - always keep pie crust as cold as you can and your pie crust and your taste buds will thank you most heartily!

Turn on your oven to 325F.

For the custard:
1 rounded tablespoon of white flour
2 oz unsalted butter
10 fluid ounces whole milk
2 oz sugar
Grated zest of one lemon or a good grating of nutmeg – I like nutmeg in my custard – it’s very traditional and reminds me of the custard tarts I had with a good cuppa for elevenses (eleven o’clock break)  at art school.
3 egg yolks whisked together

For the meringue: 
3 egg whites at room temperature - it's amazing the difference in the volume and texture between eggs right out of the 'fridge and room temp eggs - on really hot days though don't leave them out too long to spoil:))
2 tablespoons icing/confectioner’s sugar.

Melt the butter in a wide pan on the stove, when it is sizzling add the flour and whisk like a madman to make sure there are no lumps then turn the heat to low – gradually add the milk and whisk constantly to get a nice smooth sauce, add the sugar and continue to cook until it thickens well then take off the stove and whisk or stir until almost completely cool. When cooler stir in the egg yolks. Set aside for a few minutes while you get the pastry cases ready.

Put a nice rounded teaspoon of jam – your choice – raspberry tends to be a big fave in England – in each pastry shell and smooth evenly over the bottom.
Now fill your cases with the lovely custard – you can go almost to the brim as this mixture does not rise in the baking.
My recipe said simply bake for one hour – with no indication of temperature so I choose 325F as I didn’t want the custard to bake too fast and get rubbery.

After about 35 minutes whisk the egg whites until somewhat stiff – then add the sugar in two goes and whisk in between until stiff. After 50 minutes check to see if the custard is setting – wobble a bit and if the middle is still a bit wobbly it’s good to now add the meringue.
Remove from the oven and dollop goodly amounts of meringue on the top – as you can see somehow my meringue was not quite right because somewhere lurking either in my bowl or on my whisk was the tiniest amount of fat and that not only stops the whites from gaining their highest volume but also makes them look curdley and not perfect – to avoid this wash all our equipment in very hot water and suds and then to go the extra mile rinse your equipment with white vinegar too. Naughty me didn’t heed my own advise BUT the meringue was still tasty if a little flat and unattractive.
Return pies to oven and allow to brown nicely – should be another 10 minutes or so.
Remove from oven and allow to cool and then if you like your custard cold like me bob them in the fridge.
These ‘puddings’ were very good and I will make them again. I don’t know why they are called St. Leonard’s Puddings – the only reference I could find mentioned the town of St. Leonard in Hasting’s Sussex but thy didn’t mention why the pudding is associated with the town.

We have had a simply gorgeous stretch of weather here in Maine - dry, hot and very Mediterranean - yesterday these lilies bloomed, aren't they lovely?


And of course today is Bastille Day in France - a country where the art of pastry making is truly an ART and celebrated as such. Vive La France!

Wednesday, July 4, 2012

Happy July 4th 2012!

Hooray for the RED, WHITE and BLUE - sorry I couldn't do the white in white or you wouldn't have seen it!!

We are having lovely mild weather in Maine - cool, a bit breezy and overcast - really quite delightful. Here's hoping everyone has a fun and delicious day - what will you be eating, making or baking for your July 4th pudding??

Sunday, July 1, 2012

Silly Simple Strawberry Tarts for July 4th

Oh my goodness - these tarts are SO VERY GOOD and so ridiculously easy - to be honest one could happily forget the tart part and just eat the white chocolate cream filling with strawberries. If you go ahead and make this recipe you will think I am the bees knees for finding it in the June issue of British Country Living - the best magazine IN THE WORLD!!!

YOU DO NEED TO START THIS RECIPE THE DAY BEFORE YOU WANT TO EAT IT - because the cream needs that much time to set up and achieve it's delightfully luxurious and divine consistency - you can bake the tarts cases the day before too and keep them in an air tight container overnight!!

For the tart crust - I made baby tarts as you can see - if you want to make one tart this recipe is for a deep 8"/20cm radius tart pan - other wise this makes about 10 mini tarts - of course that depends on the size of your minis! I made mine with Pate Brisee from Martha but I made it too thick and I think the following recipe would be so much better as it is easier to make thinner and also doesn't shrink - which is important if you're using the mini cases!! It is from my friend Lindsey at Let Them Eat Cake Bakers in Belfast.

Pre-heat your oven to 325F...thank you!!

EASY PEASY SWEET TART CRUST: I made 10 miniature tarts from the recipe here:
1 1/2 cups/6ozs of unbleached white flour
1/2 cup/2ozs confectioners/icing sugar
1 stick + 1 tablespoon/ 4 1/2ozs butter VERY COLD
1 large egg yolk
a tad of milk or cream if your dough doesn't stick together

1. Sift dry ingredients together into a medium sized bowl.
2. Grate the butter into the dry ingredients and rub in until like breadcrumbs.
3. Add egg yolk and blend carefully until the dough sticks together
4. Mine didn't stick together with just the egg yolk so I added baby drop by baby drop some cream until it did start to come together...be careful once it does start to come together it does so quite quickly...don't let it get sticky!!
5.My mini tart cases are about 1 1/2" round so I rolled a ball of dough about the size of a large walnut and popped one into each case.
 This is too thick - do try to make it thinner than this, you'll thank me for it :)
Allow the tart cases to cool completely then melt some white chocolate - about 2oz - melt in a glass bowl over a pan of simmering water and be careful not to get any water in the chocolate or it will seize and that's no fun!!! Then coat the pastry cases with a nice slather of white chocolate.
With their coating of white chocolate
Now for the best part WHITE CHOCOLATE CREAM - so easy!!!

9 oz neufchatel cheese (I used this) OR cream cheese would work as well - the original recipe called for marscapone but I couldn't bring myself to spend nearly $7 on a container of it!! but if you want something really special then use the marscapone!

7oz white chocolate - luckily I can buy Callebaut callets (little dots) at the Belfast Coop for a very good price - use the best you can afford or find.

4 tablespoons heavy/double cream - you need this for the neufchatel or cream cheese but not if you use marscapone.
Also -  6 fluid ounces heavy/double cream - I really like Organic Valley Heavy Whipping Cream - really thick and delicious and whips so well - so whip it up and set aside.

Here's the hard part - put the cheese, white chocolate and small amount of cream if you are NOT using marscapone - in the top of a double boiler or in a glass bowl set over a pan of simmering water - wait until the chocolate seems completely melted - take off the heat and stir until well blended - allow to cool some and then put in the fridge covered overnight to set up perfectly!!
NOTE: If the chocolate is not completely melted before you stir - and this did happen to me - when you stir it it may get lumpy - not completely smooth - if this happens you need to let it cool quite a bit and then put in a blender and blend until completely smooth.

Day of devourment: A couple of hours before you are ready to assemble your tarts slice up the best strawberries you can avail yourself and macerate in a bowl with a few tablespoons of sugar  and set aside until needed.

Beautiful local strawberries - ahhhhh
Take your faboo white chocolate cream out of the fridge - STOP yourself from eating all of it now - dollop as much of this sublime nectar into either your mini tarts or your full size tart, smooth and cover with as many strawberries and strawberry juice as you feel necessary!!
EAT!!!!!!!!!!!!!!!!!!!!!!
Happy July 4th everyone!!!

This post is part of the Tea Time Treats challenge hosted by Lavender and Lovage
in collaboration with What Kate Baked

Lavender and Lovage
 http://wp.me/p287Dn-566

Monday, June 18, 2012

Merry Cherry Bakewell Fairy Cakes!

Bakewell Tarts are delicious and I have made them here on the blog before but then recently I saw this recipe on Pinterest and thought to myself – I do need to make those don’t I? They look like the iconic British Fairy Cake – a small simple cake much like an American cupcake but lighter in texture and without the great walloping swirls of frosting/buttercream – of which I am greatly fond so alas on that score!!

Anyhow I took the recipe from a Butcher Baker Blog pin on Pinterest – lots of good British pudding recipes there, do check it out!! - and I added some marzipan to it and here you have my version of the Cherry Bakewell Fairy Cake – a bit of a bogus title really as the only cherry part is on the top – they should really be called marzipan fairy cakes – but they’re not and there you have it!! Here's a link to a standard British Cherry Bakewell.

First make the MARZIPAN – if you decided to use it or buy a package of marzipan and roll into 8 even balls.

Preheat the oven to 350F.

INGREDIENTS for the marzipan if you chose to make it yourself:

2oz toasted almonds ground fine in a coffee grinder – usually you wait until warm things are cool to grind them because they get oily or damp but in this case you want to make the grind a bit soggy so I did them while they were still warm.

2oz icing/confectioners sugar

1 teaspoon almond extract/essence

1 egg yolk – from a reliable source so you have no risk of salmonella – if you are worried about using raw egg yolks them maybe just buy your marzipan or almond paste – whichever you prefer.

1. Put all ingredients in a bowl and mush/knead together until the mixture holds – break and roll into 8 even balls and put aside until later.

INGREDIENTS FOR THE FAIRY CAKES – they should all be at room temperature: This recipe makes 8 - an odd amount I know – it is supposed to make 12 but I didn’t see how you stretched the batter that far – you could go to 10 maybe and then they’d be bit more even with the top of the cupcake liner.

4 oz butter softened

4 oz sugar

4 oz flour plain/all purpose flour sifted together with 1 scant teaspoon baking powder or 4oz self raising flour

2 eggs whisked well

1 teaspoon almond extract/essence

8 scant teaspoons raspberry jam

8 glace cherries – the traditional ones and they’re nice because they’re not wet like the ones I chose which are maraschino cherries – I chose them because I found a brand which has no red dye or artificial preservatives which I like but they are wetter and should be drained for a while before using. 

If you would like to use cups instead of weights HERE'S a great place to covert:


METHOD FOR CAKES: Firstly put your cupcake liners into muffin pans to help the cakes stand up whilst baking.

1. Cream the butter and sugar together until light in texture and colour.

2. Slowly add eggs bit by bit and beat well in between additions.

3. Beat in the almond extract/essence.

4. Fold in the sifted flour and baking powder with a metal spoon – apparently this stops air escaping – a wooden spoon lets the air escape - until evenly mixed!

5. Separate your mixture in two even parts – just to each side of the bowl – and then spoon a good big teaspoon dollop of batter into each cupcake case.

6. Add a good teaspoon of jam to each and then bob the ball of marzipan on top of each blob of jam thus:
7. Top with more batter and try to smooth the batter to seal the jam and marzipan in nice and cozily:
 8. Bob into the 350F oven and bake for about 20 minutes until risen and golden and the tops spring back to slight pressure.

9. Because of the addition of the marzipan the middles dip a bit but no worries – you‘ll be filling them with icing and a merry cherry!!
10. Remove from oven and move onto a cooling rack – allow to cool completely

In the meantime make the icing – 2oz icing/confectioner’s sugar and I scant tablespoon boiling water – or a bit less – my icing was a tad runny – mix the two together and allow to thicken a bit before you use – just keep stirring if it starts to dry out on top.

When the cakes are cooled completely put a small teaspoon of icing on the top and smooth into a circle – as I said mine was a bit runny and I put a bit too much on so it ran down the edge of the cakes but you want to keep the icing in a nice neat circle on the top that stays about a good ¼" from the edge of the cakes – you can see how I TRIED to do that.
Allow icing to dry a little before adding your cherries maraschino or glace or......
...the juices will flow as above...and mess up your nice white icing :((

These are the maraschino cherries I used - no red dye and preservative free and delicious MERRY MARASCHINO CHERRIES!!
 
Look at that lovely nugget of marzipan - I love marzipan!! - I didn't add enough jam to mine as you can see so I adjusted the recipe above to give yours more and be more like the original Bakewell Tart.
Ta Dah you’ve made Fairy Cakes!!
Follow on Bloglovin