Showing posts with label cream cheese. Show all posts

Wednesday, August 29, 2012

Maine Wild Blueberry Cream Cheese Tart

I cannot believe it is already blueberry season again in Maine and to be honest it's been going a while and got started early this year just like everything else that is up to one month ahead of the usual plant schedule. So here is my Maine Blueberry via Blighty recipe for this year - Blueberry Cream Cheese Tart - another simple and delicious confection - made even simpler if you choose to purchase a pre baked/made pie crust - although if you're into making your own this recipe from Let Them Eat Cake Bakery here in Belfast is FANTASTIC and pretty easy to work with too - it's a nice sweet, very buttery rich and biscuit (cookie) like crust and never fails to delight and work perfectly - at least so far!! So let's get going so you can have your tart ready for this weekends Labor Day celebrations.

EASY PEASY SWEET TART CRUST:
Pre heat oven to 325F
Enough for one tart case 8” diameter or for me 2 nice ovals…nice and thin,
I am not a chunky crust personage so if you like a thicker pie crust make this for a smaller diameter pan:

1 1/2 cups/6ozs of unbleached white flour
1/2 cup/2ozs confectioners/icing sugar
1 stick + 1 tablespoon/ 4 1/2ozs butter VERY COLD
1 large egg yolk

1. Sift dry ingredients together into a medium sized bowl.
2. Grate the butter into the dry ingreds., and rub in until like breadcrumbs.
3. Add egg yolk and blend and squush carefully until the dough sticks together. This may take a little time but despair not it will come together - just don't let it warm up - pie crusts pastry should always be kept as cold as possible to make it flaky and divine.
4.Tear dough into big chunks…..place strategically in pie pan and start squushing to a create a smooth even covering of the entire pan…he beauty of this crust is that it does NOT shrink at all…it stays put…good crust!!...and it tastes like a really good shortbread…yum!!
5. Bob into the fridge for at least 30 minutes.
Remove from the fridge and prick the pastry all over with a fork - this is to prevent bubbles forming when you bake. Next I lined the pastry with parchment paper and weighed it down with split peas - you can use beans or pie weights but don't go down the road of popcorn as I did once - you can guess at those results.
Bake for about 15 minutes, remove from the oven, genteely lift the paper and weight from the shell and bob pastry back into the oven for about another 15 minutes - don't worry when you take the weights out if the pastry looks soggy and sad - it will improve by the next time you take it out of the oven :))

Keep your eyes peeled - you want the crust to be evenly browned as below - oh my - I have to say these came out PERFECTLY!!!!
and look - NO shrinkage!! weee heeeeee - so many times I have made pie crusts and when I take them out of the oven they are halfway down the side of the pan - disappointing to say the least.
Now let your cases cool completely and keep in a nice dry spot until you are ready to use them.
The filling ingredients - oops - minus the sugar!!

Wallaby Sour Cream is FANTASTIC avail yourself of it if you can - wow is it good!! At the Belfast Coop it is the exact same price as non-organic - an added bonus what?
FOR THE CREAMY PART:
4oz full fat cream cheese
2 fl oz/ 1/4 cup sour cream
2oz sugar
2 teaspoons lemon juice or more to taste
Grated zest of one lemon
Grated nutmeg to taste - I love nutmeg so I added plenty.
1. Cream all the above together until smooth - phew - that was hard!!
This is a really excellent cream which can be used for all sorts of things like dolloping on pies or on a slice of bread - whatever taste it and see!!
Simply dollop yummy cream into your prepared pie shell and smooth - as you can see mine isn't so smooth as I creamed by hand and had little lumps of cream cheese abounding and the zest gives a little texture too - but that's OK it doesn't affect the taste! 

  THE BLUEBERRY PART:
Now there's the easy way I gleaned from the book I used - "Country Harvest" - A Celebration of Autumn by Linda Burgess and Rosamond Richardson - a very informative and beautiful book with lots of good autumnal recipes.
EASY WAY
1 1/2 lbs Maine wild blueberries - the small ones - if you can get them
4oz/1/2 cup sugar
1 tablespoon lemon juice
1. Gently cook the ingredients together until the juices run from the blueberries.
2. Continue cooking gently, but do not let get mushy, until the liquid gets syrupy.
3. Allow to cool and spoon over your tart.
THE HARDER WAY:Of course this is the way I chose and if I made these pies again I'd stick with the easy way as I lost some of the blueberry flavour in the jelly I made:
Same ingredients plus one package of either gelatin (non vegetarian) or 2 packages of Natural Dessert Unflavoured Jel - which is vegetarian and possibly also vegan.
I used the latter and made up the blueberries to 32 fl.oz or 4 cups total with water but you know I should have used blueberry juice and the results would have been MUCH better so if you go this way use blueberry juice - or another juice if you are feeling adventurous - apple would work well I think - anyhow -  and then followed the instructions from the packet - with the Natural Desserts you have to work quickly and it can be fickle and not set but it worked fine for me this time - apparently too much acid like lemon will stop it from setting though so the amount I used must have been fine. 
Ta dah my blueberry jelly (jello) worked fine but was not so flavourful because I used water :(( 
The blueberry barren next to our house was 'fallow' this year - commercially the crops only produce every other year - so here are some pictures from last years crop - they are so pretty - the blueberries I mean.  
This photo is available at my Etsy shop
After the crop has been picked - the Autumn colours are wonderful.
So Happy Labor Day weekend one and all - if you make the pie let me know how it came out and feel free to post your pictures of it on my Facebook page - Thanks!! 
HAPPY BAKING!! 

Sunday, November 21, 2010

Coventry Tartlets made with Green Hive Honey...yum!!


How lucky am I that I get to make delicious Coventry Tartlets using Green Hive Honey which is not only raw and local but also packaged with a label I designed...this is the Bees Knees for me!!!
This is a simple and really delightful recipe which could be an easy addition to your Thanksgiving array of desserts.

I began with an oh-so-easy tart crust gleaned from my friend and baker Lindsey Schortz of
let them eat cake , Belfast...it is astoundingly easy and so reliable...it doesn't shrink and gives a rich almost cookie like crust...YUM!!!
Pre-heat your oven to 325F...thank you!!

EASY PEASY SWEET TART CRUST: I made 10 miniature tarts from the recipe here:
1 1/2 cups/6ozs of unbleached white flour
 
1/2 cup/2ozs confectioners/icing sugar
1 stick + 1 tablespoon/ 4 1/2ozs butter VERY COLD
1 large egg yolk
a tad of milk or cream if your dough doesn't stick together

1. Sift dry ingredients together into a medium sized bowl.
2. Grate the butter into the dry ingreds, and rub in until like breadcrumbs.
3. Add egg yolk and blend carefully until the dough sticks together
4. Mine didn't stick together with just the egg yolk so I added baby drop by baby drop some cream until it did start to come together...be careful once it does start to come together it does so quite quickly...don't let it get sticky!!
5.My mini tart cases are about 1 1/2" round so I rolled a ball of dough about the size of a large walnut and popped one into each case.

Then joy of joys I just squashed and pushed the dough to line the tart cases one by one...isn't that simple? I let the dough be quite thick as it so delicious and cooks through very evenly and nicely!!
Now fill the cases with this simple creamy deliciousness:

Coventry Tartlet filling:
4 ozs cream cheese/ 1/2 an average pack
1/4 cup/3 ozs raw honey or regular - doesn't have to be raw

1/8 cup/1 oz butter (I always use salted because I like the flavour)

1 egg yolk
1/4 teaspoon freshly grated ye olde nutmeg
2 teaspoons (or one if you like and just want a hint) lemon juice.

1. Cream butter and cream cheese together.
2. Add honey and cream some more.
3. Add rest of ingredients and cream together and then fill the cases to quite full, the mixture expands a little as it cooks but not a lot...when it is cooled it will fall but that's just the way of this recipe....

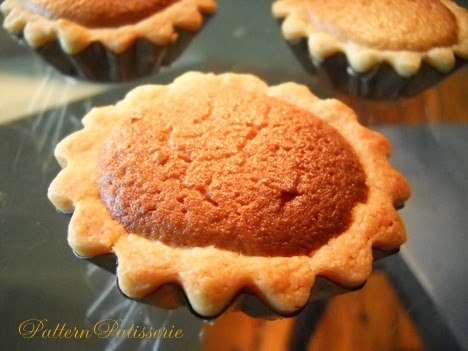
Pop your little darlings into the pre-heated oven at 325F and cook for about 25 minutes until nicely and evenly browned...until they look like this dreamboat below!!

Sorry about the wonky spacing in this post...I made one draft and when I published it it was all deleted and it is hopping around all over the place so I am leaving the odd spacing as I don't want to type it again for the third time...thanks for your patience!!

Happy baking!!! I will have another recipe coming before Thanksgiving...Cranberry Steamed Pudding with (Green Hive Honey) Sauce...ooh la la!! 
Follow on Bloglovin

Saturday, February 13, 2010

Coeur a la Creme, or in my case Petit Montagne a la Creme, with Lemon Curd!!

Yes, I know I should have little heart shaped molds for this BUT I didn't have any on hand, I did, however, have little flat topped mountain shaped ones so that's what I used! There are two parts to this recipe...the creme part which takes overnight and the curd part which takes about 40 minutes total, so start the day before in order to have it all right 'on the day'

PS The type is all over the place today on this posting and will not behave so forgive me for my inconsistency in typefaces!


CREME RECIPE:

6 ozs cottage cheese

4 ozs cream cheese

¼ cup either sour cream or crème fraiche (I used sour cream)

4 tablespoons of confectioners/icing sugar…more or less depending on your sweet tooth, the recipe I worked from said 1 tablespoon for twice the ingredients but that was way too subtle for moi!!

1 teaspoon vanilla essence/extract

1. In an electric blender, yes I gave in to technology on this one, blend the cottage cheese, cream cheese…you know what, everything above…until super smooth.

2. Find yourself a ceramic mold with holes in the bottom…I don’t know where mine came from but I just happen to have 2 on hand, you can also use small clay plant pots that haven’t been used before and give them a good soapy washing and a good rinse or, if you are very fancy, you can buy the special Coeur a la crème molds which are little ceramic hearts, hence the Coeur part, with holes in the bottom.

3. Cut some squares of cheesecloth (some people use paper towels for this but I prefer cheesecloth which you can actually buy at the supermarket if you look hard enough..try to get the tightest weave you can, not too open)…usually you use two per mold layered one on top of the other, then wet them and wring them out thoroughly, this helps the liquid to drain more easily, if you use dry cloth sometimes it won’t drain at all. Line the inside of the molds with the cloth.

4. Pour the cream mixture into the lined molds until nice and full then tap the molds hard on a smooth surface to help any air bubbles rise to the top and pop away.

5. Put the filled molds on a cooling rack or similar over a plate so the whey can drain away nicely and pop in the fridge overnight.

The Lemon Curd Recipe:

3 egg yolks lightly beaten

½ cup sugar

¼ cup plus 2 tablespoons of freshly squeezed lemon juice

½ stick/2oz butter (yes I used salted, I like that kind of taste!!)

1. Put a pan of water on to simmer, you’re going to be using a double boiler to make the curd.

2. In another non-reactive pan or glass bowl mix together all the ingredients EXCEPT the butter and then put bowl or pan over the simmering water and stir, stir, stir until the mixture thickens slightly…the sauce can be a little runny when ‘set’…you don’t want it quite so hard as the usual curd…

3. Take curd off the heat and stir in the butter until all melted then allow the curd to cool….you can make this the day before or just before you are ready to unmold the crème.

To assemble:

1. Pour a goodly amount of the curd into the bottom of your chosen crème vessel.

2. Very gently tip a crème out of the mold and very gingerly remove the cheesecloth.

3. Pop the crème into the pool of curd…add a rose geranium leaf for adornment or a strawberry, or a raspberry or whatever you would like…a chocolate truffle…go crazy.

This is a very subtle dessert, the crème is very cremey and just slightly sweet but combined with the tangy bright curd it makes a lovely treat for Valentine’s Day especially so if you can get your hands on some Coeur molds…kind of helps if the dessert is heart shaped!!