Showing posts with label raw honey. Show all posts

Wednesday, April 11, 2012

A new design for Green Hive Honey's Bees Knees

Here is the original 40 oz jar and label design of "The Bees Knees" from Green Hive Honey Farm of Camden, Maine. Just recently Magy and Clay decided to do some smaller jars containing 1lb of the delightful elixir so a new jar was resourced and a new label needed - a much smaller, rectangular one. So the original was 3.3" diameter thus:
...a nice amount of space to fill - and the new size is 2.5" deep by 1.5" wide rectangle - a mite trickier to work with and get all the visuals and the necessary type in - but I rose to challenge and here is the result:
Front label
Back label
Luckily - or smartly for I am being humble - I had originally created all the attendant motifs for the design and logo as individual parts when I painted them in watercolour so after I had scanned and cleaned them they are easy to move around as necessary and resize for new layouts.
I printed the labels up on full sticky sheets and cut them out individually with my trusty Xacto and a cutting board that is as old as the hills.
Don't you love the way they look all laid out together - they look like old fashioned trading cards or the cards one - not me but one -  used to get in cigarette packets in another age.
...and here are the new jars filled and ready to go off to "Fresh off the Farm" in Rockport - see the Green Hive there in the background?

Thursday, January 26, 2012

A new design for Green Hive Honey Farm.

Green Hive Honey Farm of Camden, Maine found some lovely 1lb Muth bottles for their delicious raw honey and asked me to redesign the original label (see a few pics down) to suit this new silhouette - an arched label for the front and a narrow label to hold the ribbon around the neck.
The neck label layout and a mock up of the finished (unfilled) bottle

 I printed up 120 of each of the new labels and I love how they look all laid out together like this - each of the arched labels were cut out by hand - always more service than seems necessary!!
 Seeing the design laid out like that above gave me the idea to do a textile design for my Spoonflower print-on-demand store and below you see the result of this idea.


 Above is the original label and below a print I created from all the component motifs which is available as an archival print from my Etsy shop.
These lovely Muth jars filled with wonderful Green Hive Raw Honey is available from Fresh Off the Farm in Camden.

Wednesday, January 19, 2011

Green Hive Honey Farms Valentine's Special Edition packaging..."Honey BEE Mine"


Here is the finished product "Honey Bee Mine" how can you resist buying this for YOUR Honey for Valentine's Day? A jar of Green Hive Honey Farms Raw Honey with 4oz of delicious Honeycomb, a special label, a heart shaped tag, a cellophane bag, dried rosebuds, a sparkly ribbon and the inestimable addition of a handmade tissue paper
paeonia on the top?


 I started by designing a special label based off the original design I created a few months ago...of course it still had to be on a pastel pink background but this time we choose a round label because of the softness of the shape...no sharp corners here!

Next I created a heart shaped hang tag which is tied with a ribbon to the package - you can write your love note on the back...how sweet!

Above is one of the first try-outs which was greatly liked but not practical for packing or shipping and the label was just to get a feel for the direction 

My work surface covered in Valentine's accoutrements.....

My first two tissue paper paeonias - so easy to make - and some lovely dried rosebuds
from the Belfast Coop
 
and more paeonias...I need to make quite a lot but they are very satisfying and soothing to make... did I EVER mention how much I like pink?
 I couldn't resist sharing this picture....my favourite colour combination...YUM!!


Sunday, November 21, 2010

Coventry Tartlets made with Green Hive Honey...yum!!


How lucky am I that I get to make delicious Coventry Tartlets using Green Hive Honey which is not only raw and local but also packaged with a label I designed...this is the Bees Knees for me!!!
This is a simple and really delightful recipe which could be an easy addition to your Thanksgiving array of desserts.

I began with an oh-so-easy tart crust gleaned from my friend and baker Lindsey Schortz of
let them eat cake , Belfast...it is astoundingly easy and so reliable...it doesn't shrink and gives a rich almost cookie like crust...YUM!!!
Pre-heat your oven to 325F...thank you!!

EASY PEASY SWEET TART CRUST: I made 10 miniature tarts from the recipe here:
1 1/2 cups/6ozs of unbleached white flour
 
1/2 cup/2ozs confectioners/icing sugar
1 stick + 1 tablespoon/ 4 1/2ozs butter VERY COLD
1 large egg yolk
a tad of milk or cream if your dough doesn't stick together

1. Sift dry ingredients together into a medium sized bowl.
2. Grate the butter into the dry ingreds, and rub in until like breadcrumbs.
3. Add egg yolk and blend carefully until the dough sticks together
4. Mine didn't stick together with just the egg yolk so I added baby drop by baby drop some cream until it did start to come together...be careful once it does start to come together it does so quite quickly...don't let it get sticky!!
5.My mini tart cases are about 1 1/2" round so I rolled a ball of dough about the size of a large walnut and popped one into each case.

Then joy of joys I just squashed and pushed the dough to line the tart cases one by one...isn't that simple? I let the dough be quite thick as it so delicious and cooks through very evenly and nicely!!
Now fill the cases with this simple creamy deliciousness:

Coventry Tartlet filling:
4 ozs cream cheese/ 1/2 an average pack
1/4 cup/3 ozs raw honey or regular - doesn't have to be raw

1/8 cup/1 oz butter (I always use salted because I like the flavour)

1 egg yolk
1/4 teaspoon freshly grated ye olde nutmeg
2 teaspoons (or one if you like and just want a hint) lemon juice.

1. Cream butter and cream cheese together.
2. Add honey and cream some more.
3. Add rest of ingredients and cream together and then fill the cases to quite full, the mixture expands a little as it cooks but not a lot...when it is cooled it will fall but that's just the way of this recipe....

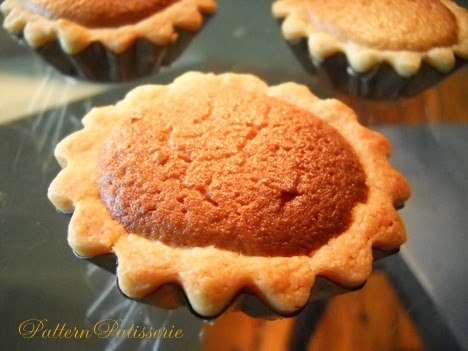
Pop your little darlings into the pre-heated oven at 325F and cook for about 25 minutes until nicely and evenly browned...until they look like this dreamboat below!!

Sorry about the wonky spacing in this post...I made one draft and when I published it it was all deleted and it is hopping around all over the place so I am leaving the odd spacing as I don't want to type it again for the third time...thanks for your patience!!

Happy baking!!! I will have another recipe coming before Thanksgiving...Cranberry Steamed Pudding with (Green Hive Honey) Sauce...ooh la la!! 
Follow on Bloglovin