Thursday, August 26, 2010

WHY have I never made Summer Pudding before???????


Pray tell...what is this lurid image I see before me? Why it is a Summer Pudding...a deceptively, almost cheekily simple dessert from the Isle of Blighty!! WHY have I never made it before...because I have always thought it is too simple to be truly good...was I right..NO I WASN'T...it is SSSOOOOOOOOO good, it so transcends the sum of it's parts, it is sublime and anyone can make it...really anyone!!
All you need is some good soft, summer fruits...I used just blackberries and raspberries but if you are lucky enough to have on hand red, white and/or blackcurrants, strawberries, loganberries, cherries or blueberries you can use any combination of two or three or all of them...

THE RECIPE:
8ozs raspberries

8ozs blackberries
(or 1lb of the above fruits in whatever combination you are inclined to use them)

4oz / 1/2 cup of sugar

about 4/6 slices of good white bread...something with a bit of backbone not the squushy stuff
THAT'S IT for the ingredients!!...well also some lightly sweetened whipped cream to finish.

1. Combine the fruits and sugar in a heavy pan and bring to a slight boil, stir gently and simmer for a brief minute. Take off the heat.

2 Cut the crusts off the white bread slices and line a medium sized pudding bowl with them...I did this in a rather haphazard manner but if you are somewhat organized you can cut the bread into triangles and apparently that'll make your life easier with the fitting of the curves, leaving no gaps and saving one slice to top the pudding with, as you can see below I ran out of my sliced white loaf and ended up using some baguettes slices but that's a bit naughty!!

3. Spoon half the berries and juice into the lined pudding basin, then add the crusts (not traditional but I didn't want to throw the crusts away and this gave my pudding a little more structure), or a circle torn from one slice of bread to fit in the bowl, and finish with the rest of the berries and juice.

4. Then cover the pudding with the final slices of bread torn to fit...not like mine with baguette slices!!!
5. Now find a saucer or similar...I used the top of a yoghourt container, and place some weight on to the saucer...I put a bottle of cider vinegar in a small flat bottomed bowl, and leave in the fridge overnight to settle.

6. Next day take the weights off and run a knife around the edge of the pudding to loosen it from the bowl...I also ended up dipping the bowl into hot water to help loosen...then invert the bowl onto a plate...good luck with this part!!

7. Dollop oodles of lightly whipped, lightly sugared cream around the screaming magenta pudding and eat to your hearts content...this pudding will not stay around for long so plan on having all the ingredients to hand the next day to make another...that's what I'm going to do!!
 I am thoroughly gobsmacked that this simple dessert is so delicious and could kick myself for never having tried it before...I am a total Summer Pudding convert.

Follow on Bloglovin

Friday, August 13, 2010

The Sugar Shack Cupcakery Logo!!

About a month ago a lovely lady from Brooklyn New York called Jill London contacted me through Etsy to request a logo for her Cupcake Bakery "The Sugar Shack"...OF COURSE I was only too happy to comply and above you see the finished result...what fun to design and render in colour pencils and shades of my favourite delicious pink...I hope my logo does her cupcakes justice!!
Here I am drawing the logo on my trusty Aquarelle Watercolour Block which keeps the paper nice and tight and smooth.
...during the process I surround myself with other cupcake drawings to refer back and forth to on colours and style and I have on hand photographs of actual cupcakes to reference details of shadow and light.....to be surrounded by cupcakes is delightful...that they weren't edible was hard!!! Jill doesn't have a website yet but when she does I'll put a link here on my blog to it.

Look at this lovely comment Jill left at my Etsy store, thank you Jill, you were a delight to work with too!!
"What an amazing artist! Not only is she talented but she is such a wonderful person. These past few weeks of working with Patricia I feel like we built not only a business relationship but almost a friendship. Her willingness to help me has been a blessing in so many ways. I feel so lucky to have found her right here on etsy! I would recommend her work to the world! Thanks so much for helping make my dream into a reality!
Much Gratitude,
Jill"

As I neared the completion of the drawing I am sad to say my Little Sweet Pea Puppy Bunny passed away quietly and peacefully in her sleep in her favourite spot, what a lucky girl!! She was old and frail and it was her time which makes it all a little easier to bear but we do miss her dreadfully and thank her for the wonderful time she spent with us. As she was a rescue dog we do not know how old she was but we had her with us for 10 good years.
Bye bye Little Friend xxxxxxxxxxxxxxxx

Sunday, July 18, 2010

Evangeline enjoys solar cooked rice pudding!! YUM!!

Here is Evangeline, my latest hand made Teddy Bear, enjoying her very first bowl of Rice Pudding made with solar energy...in Maine!! Evangeline likes her Rice Pud the British way - cold with a nice dollop of Cheery, or even Cherry Preserves! Any flavour of jam will do but we only had Cherry today so that's what we had!!
The first most important part of today's recipe is a nice clear sky, very little breeze and preferably high temps to increase the cooking speed.
My very own solar cooker sitting on a chair on the deck at the front of the house. The solar cooker needs to be facing directly towards the sun and in our hemisphere that means turning a little every now again to keep up with the direction.
Here is the rice after having been in the cooker for about 1 hour...for this recipe it doesn't have to be completely cooked at this point.
The finished pud...doesn't this look just like Rice Pudding...even down to the crackly skin, a part I loathed as a child but now enjoy!!!! And look how good it looks below...with a drizzling of local honey.....it is SO GOOD, super creamy I think because it cooked so slowly for so long.....
THE RECIPE...so simple
1 cup white rice...I used basmati long grain because of it's fragrant nature but I think any white rice will do...but I may be wrong
2 cups half and half
1/2 cup sugar
2 eggs beaten til smooth...no gruddy lumpy bits please!!
1 tablespoon vanilla essence/extract
A goodly grating of fresh nutmeg
FOR A NORMAL COOKING SITUATION:
1. Place rice in a heavy saucepan with enough water to cover, bring to a boil. Reduce heat and cook for about 20 minutes (I put mine in the solar oven with lots of water to cover and it took about 1 hour to get to the point you see above in the 4th pic down...fluffy but not completely cooked.
2. Stir the 1/2 & 1/2, sugar, nutmeg and vanilla into the rice and cook over very low heat on the stove top for about another 20-25 minutes, until thick and the rice is very tender.....I left mine in the solar cooker for about another 1 1/2 hours.
3. Add a little of the warm rice to the eggs to help temper them and not scramble them when you add them to the body of the cooked rice.....add a little more and a little more and then stir the egg mixture quickly back into the main rice mix...again being careful not to let the eggs scramble. Place this egg, rice mix into an oven proof bowl and set into a 350F oven for another 30 minutes or so. I did the egg mixing part and then left the solar cooker out for about another 1 hour, the solar oven is certainly not an exact science and times will vary with temperature and wind so you just have to keep checking and eyeballing when you think the recipe is ready at the different stages. Thus the reason why I choose to do Rice Pudding instead of a souffle....but I bet someone somewhere has tried something difficult...let me know if you see something of that nature and I'll do a link to it here on my blog!!!!
4. Leave to cool and then bob in the fridge for a few hours 'til nice and chilly.
This is the best rice pudding I ever made and I didn't use one calorie of energy!! YEA!!!...oh except the fridge part...sorry!!
Happy Cooking with the sun!!


Please click HERE for links to all sorts of wonderful sustainable blogposts from Frugally Sustainable - thanks!!

For more amazing info about solar cookers and cooking follow this LINK
If you are interested in energy producing sculpture
that looks like this:
Energy producing sculpture by James Strickland
....then please consider joining the Facebook page of James Strickland's HELIOCENTRIC SCULPTURE 
and here is his website too:

www.jamesstricklandart.com

Thanks!!


Tuesday, July 6, 2010

Jolly Hollyhocks and Delphiniums!

Am I a lucky girl...from whenst did these pink hollyhocks come??, for indeed I did not plant them but OH! how happy I am they are here. Aren't they the most luscious pink and up close they almost look like they are fashioned from some delightful sugar paste...they are delicately edged in scallops and are almost transparent...I love them and thank the little bird or chipmunk who dropped their seeds.
and below...delphiniums...who knew I liked delphiniums?...certainly not me , just the name put me off as some dry and boring plant one finds in a Victorian drawing room...I think I was thinking of Aspidistras perhaps??? and the good old Gracie Fields song from when I was little, two hundred and fifty years ago, "The Biggest Aspidistra in the World" a riveting ditty that definitely wrote in stone my feelings about said plant!!
LUCKILY I discovered delphiniums a couple of years ago and boy are they beautiful...all of mine are in shades of BLUE and lilac, I'll have a picture of the really blue one next week when they have filled out, they take a nice long time to fill out their flowers and then their flowers stay a long time too....good bang for your floral buck!!
...and here's Mr. Bee doing his job diligently...he's the Bees Knees isn't he?? Ha ha!!
Ha ha indeed, James was just 'droning' on to me about the fact that all bees out gallivanting collecting honey are in fact girls...thanks James!!! Sorry BEE!

Friday, July 2, 2010

Cornish Strawberry Puffs or Toffee Strawberry Half Moons

Wallowing luxuriously in a pool of delicious organic cream are simple Sweet Cornish Pasties. Cornish Pasties are usually savoury with a meat and potato filling but here they have been transformed into a little bite of heaven filled with fresh strawberries and baked in a caramelly sauce that coats the pasty with crunchy deliciouness only found in your dreams!!!
I have been eyeballing this recipe for many a year. It was published aeons ago in an issue of Australian Vogue Food...a wonderful magazine that I can't find in Maine anymore...boo hoo!!

Pre-heat your oven to 450F...nice and toasty
INGREDIENTS: Makes three PUFFS
PASTRY
2oz/2 tablespoons butter
1 cup/4oz of unbleached white flour
1 egg beaten
a little milk
Fresh Strawberries
SYRUP
2 cups/16 fl oz water
1 cup sugar
1 oz/1 tbsp butter
METHOD:
1. Rub the butter into the flour.
2. Add the beaten egg.
3. Add a little milk, a very little milk in my case, to help form a soft dough.
4. Roll out the dough, it will be sticky so have a lot of extra flour on hand to help unstick, to about 7" circles as above.
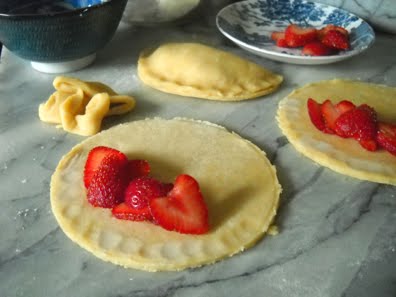
5. Place a few slices, about 7, of strawberries as above on one half of the circle...put a dabbling of milk around that semi circle of the dough and fold over the strawberries and gently press to stick
8. For the syrup...boil water, sugar and butter together for about 7 minutes until it begins to thicken.
9. Pour the syrup into cast iron pan or other metal receptacle, and put into your 450F oven until it is bubbling happily.
10. Remove carefully from the oven...boiling syrup is a horror to get on your skin!!!...gently place your three pasties into their caramel bath and return to the oven.
11. In 10 minutes baste the pasties with caramel.
12. In another 10 minutes baste again...and then another 10 minutes you should be done, the caramel should have greatly reduced and be bubbling like Billy-o.

The first batch I did the caramel got to the hard crack stage and was really good, the second batch I took them out too early and they were at the chewy stage but I think that may also have had a lot to do with the extremely humid weather we were having then....so it is a bit finicky knowing when to remove them just don't let the caramel BURN...so long as it is not burnt the pasties will be GREAT!!!

You can eat them hot bathing in a pool of heavy/double cream or wait 'til they are cool and crunchy...they are literally toffee covered pasties with a little delight of strawberries in their centre!!! YUMMMMM!!! I have not seen a recipe like this before where you bake in basically simple syrup but I have to tell you I really like it.
Happy Baking!!!

Saturday, June 19, 2010

A bouquet worthy of Fantin-Latour!!

WOW! I wish you could smell these paeonias!! A subtle, old-fashioned, elegant fragrance that wafts and whispers so beautifully! This is just one bouquet from a plant that is sporting about five times this many blooms. Thank you Paeonia!!
When I see a prolific and exuberant bouquet like this it always reminds me of the time at Poly. doing my Foundation Course in Art and Design when I had to copy a Fantin-Latour painting as an ETCHING!!! OMG it nearly killed me but I did it and thus my appreciation for said Master's bouquets was born....they are so luscious and drool worthy, he captures the soul of the flowers, their volume and evanescence...you really can almost smell his paintings.
Happy Glorious Saturday in Maine...the breeze is blowing great billows of rosa rugosa through the open windows and the birdsong fills the air!!
DELIGHTFUL!!!

Tuesday, June 15, 2010

Who is this little Rascal??

Goodness gracious...who is this Rascal Bear from Maine with his dapper little silk scarf and winning smile?? Why it's Monty and I made him in the last couple of days from leftover home decor fabric a good friend of mine in New York sent to me to use as was my wont.
I have pondered the proposed usage, some pieces are large enough to make clothes from, BEAUTIFUL clothes (and Yeh right...WHEN am I ever going to get around to that and Oh YEH...making clothes used to drive me demented and many's the time I wanted to fling the sewing machine out the window!!), other pieces are long enough to make lovely scarves and possibly handbags but what to do with the small pieces that don't seem quite big enough for anything practical??
PRACTICAL?...why must it be practical...I have wanted to make small Teddy Bears for many a long year now and then DING...this is the perfect material to make little Teds from and thus my new string to an already full bow is born. The pattern I used is actually for a bear that ends up being 3 inches tall......not a good idea for my first attempt so I scanned and enlarged and here's my first Ted, completely hand sewn, which is so much more fun than machine sewing in my book!!...he is filled with leftover scraps of the fabric I actually used for him (is that cannibalism??...is he a Haggis...Ha ha!!) and also buckwheat husks which are available in bulk at the Belfast Coop at an extraordinarily reasonable price. He is finished with criss cross stitches over the seams in leftover wool from my adventures in handtufted rugs.
I am already planning my next Ted...from some large weave pink silk Chanel looking fabric...very fetching and I shall 'stuff' Milady not only with buckwheat husks but also some lavender flowers for a slight delightful fragrance!!
I'll be adding my Monty to my Etsy shop later today after I have designed and printed a little Certificate of Authentication with date of birth etc and also to my Facebook Store...yes I have a store on Facebook...isn't that amazing?
Feedback on Monty is requested and appreciated!!
And here's a stunning lavender iris for you!!

Friday, June 11, 2010

Easy Peasy Strawberry and Almond Scrunch!! YUMM!!

Here is a very delightful and super easy summer recipe that resembles an English trifle but is less fussy and much quicker to put together...get the best flavoured strawberries you can...I use Driscolls Organic Strawberries from California and they're delicious!!
This recipe is adapted from "The Food for Thought Cookbook" by Guy Garrett and Kit Norman.
Food for Thought is a famous vegetarian restaurant in Covent Garden London
THE RECIPE:
1lb strawberries...washed, sliced and sprinkled with sugar...do this first to allow strawberries to macerate and give up some of their juices
Scrunch:
3oz butter
4ozs/1 1/2 cups rolled oats
2ozs/ 1/2 cup wholewheat flour or I do mostly white flour and some ground flax seeds to make up the difference...for a more nutty flavour
3ozs/ 1/3 cup sugar...brown or white your choice.
1ozs/1/4 cup toasted sliced almonds crumbled up
Creamy Part:
1/2 teaspoon almond essence/extract
5 fl ozs plain yoghourt (preferably drained in a cheese cloth for a couple of hours to get rid of some of the whey and make the yog. a little thicker...or you could use Greek Yoghourt)
10 fl ozs whipped double/heavy cream....to soft peaks...still needs to be a little loose.
2 tablespoons clear honey....I use a nice strong flavoured one from Maine...Swann's Wildflower Honey....delish!!
Extra 1oz toasted almond slices for top of dessert/pudding.

METHOD:
1. To make Scrunch: Pre-heat oven to 375F
2. Place all ingredients into a mixing bowl and rub butter into the other ingredients until thoroughly distributed.
3. Press gently into a flan/pie ring with a removable bottom...mine was about 9" diameter.
4. Bake for about 20 minutes until golden brown, remove from the oven and allow to cool.
Here is the Scrunch when cooled....
5. Mix honey into yoghourt with almond essence/extract.
6. Gently blend/fold honey and yog with whipped cream.
Now assemble your Scrunch....break up Scrunch base into smallish pieces and cover bottom of chosen bowl with such, strew half of strawberries and their juices over, cover this with half of the creamy bit...then repeat again finishing with cream mixture but saving a few strawbs. for the top. Sprinkle finished piece de resistance with reserved strawberries and toasted almonds.

Ta dah...allow to sit for a short while before serving so the strawberry juices can meld with the cream, yog. and scrunch. YUMMM!!!
Happy Strawberry season!

Sunday, June 6, 2010

Fried Oreos and a salmon pink poppy!!

Look how cute!!! Deep fried Oreos...how can one resist!
James and I were recently in Lewiston, Maine on a picture perfect day and we decided to stop at a place we hadn't been to before for a spot of lunch...Val's Drive-In. I am happy to report we were not disappointed...the food was great...I had an excellent veggie burger, the portions were the perfect size...not huge and overwhelming...and the piece de resistance was...ta dah!! Deep Fried Oreos.....they were delicious
Our little friend the Oreo set against the backdrop of the All American Val's Drive-In...who could ask for anything more!!
The waitresses at Val's bidding us a fond farewell....
and a portrait of Jennifer our happy, friendly, attentive server. Thanks Jennifer!!...we'll be back.
I know this is not related to the Fried Oreos but this flower came out in the last couple of days and I just had to share it with you because the colour is THE perfect pink and the flower itself is beyond beautiful...the inside is the most evanescent smoky grey purple...almost indescribable...
more buds are ready to bloom in the next few days!!! Lucky me!!

Sunday, May 30, 2010

Poppies, Lupines and Iris...oh my!!

The sun is shining, the birds are singing and the bees are buzzing, you can see three busy bees right there in the poppy above!!The flowers here in Midcoast Maine are breathtaking right now...we have bright red ballerina poppies, fields of lupines, huge pendulous spiraea heavy with flowers and many colourful irises.
These pictures say it all!!
Plus poppies are for remembrance which is appropriate on this Memorial Day weekend.

Here's to summer 2010!!

Wednesday, May 26, 2010

Rhubarb Mintade and Rhubarb Layer Cake!

Isn't this the most luscious and lovely colour?! It is rhubarb and mintade and it is SO easy to make...and yes I have taken my own sweet time doing this post...forgive me!!

4 stalks of rhubarb (no leaves)

3 stalks of mint leaves or about a good handful of leaves

1/2 cup/4ozs sugar and some honey of your choice...I use Swann's honey from Maine, the wildflower variety which has a good strong, old-fashioned honey taste...almost like mimosa flowers...has anyone ever had those crystallized...I had them as a kid and I loved them.
Anyways...cut the rhubarb into small pieces and put in a pan with the sugar and about 2 tablespoons of honey, you won't need any water and bruise and muddle the mint leaves in there too, stir all together....put on low heat and cook until the rhubarb completely breaks down...allow to cool and check for sweetness.

When cool pour all into a strainer over a bowl and allow to strain completely...the resultant thick juice is ready to be used over ice cream or thinned to your desired consistency for a nice soothing, cooling delicious beverage of a beauteous hue!!

Happy Quaffing!!
Here's my made-up Rhubarb Layer Cake...got so much rhubarb have to figure what to do with it all. My Mum used to make an apple sauce cake this way so I thought why not do it with rhubarb.

First of all double the recipe above for the Rhubarb Mintade, leave out the mint and only cook 'til the rhubarb begins to soften...you don't want it mushy for this recipe...do strain again so the rhubarb isn't too wet.
Make the very simple cake batter: Pre heat oven to 425F

1 cup/8oz of sugar

2 sticks softened butter (yes I use salted but you don't have to)

10 1/2 ozs/2 1/4 cups white flour sifted

4 large eggs whisked at room temperature

1 1/2 teaspoons vanilla

1 teaspoon cardamom

1. Cream butter and sugar together 'til light and fluffy.

2. Add eggs a bit at a time and beat after each addition...you are doing it bit by bit so the mixture doesn't curdle but if it does don't worry it will come back when you add the flour!!

3. Add the sifted flour and cardamom in 2 or 3 three additions and mix well but don't beat..cream.

4. Butter and flour a small cake pan...mine was about 7" but nice and deep...put half of the batter into the pan.

5. Pick out some nice whole pieces of rhubarb from the cooked rhubarb and set aside.

6. Now spread the rest of the cooked rhubarb over the batter.

7. Spread the rest of the batter over the rhubarb...if is it hard to spread...this is a thick batter...use a wet spatula to spread, that really helps.

8. Now put the whole pieces of rhubarb on the top of the cake in a pretty pattern, as below, or an ugly one if you are feeling grumpy!
I put an extra sprinkling of sugar over the cake before I put it into the 425F oven for about 35-40 minutes...the wetness of the rhubarb will determine how long to cook...insert a thin knife into the cake to see if it is done...should come out clean but you also have to determine if it is not clean it may be the rhubarb sticking to the knife, come on Nancy Drew/Enid Blyton you can do it!

Friday, May 21, 2010

How green is my garden!

WOW!! It really is this green out there...no photoshopping or doctoring of colours, this is how it looks right out my window right now!! Above you can see all the poppies waiting to burst forth....and below...
the first Lupine opens it's beauteous petals to the clear, shining azure blue skies...it is GORGEOUS here in Maine today, a cool breeze...birds singing, bugs buzzing...the first June bug showed up last eve, a little early perhaps but we were glad to see the little guy.
The delphiniums are burgeoning forth along with wild daisies, paeonias and irises. I'm so excited to see my dear flower friends return once again...welcome!!